OSCILLOSCOPE:
 IN PRACTICE
HOW USE IT PRACTICALLY
List of controls or adjustments
Here are shown all basic details to utilize the oscilloscope, what all keys, selectors and potentiomenters are used for.Once learnt the basic principles, this section appear pheraps, at first sight, such long and boring but to tell the truth it is just the list of all items that an oscilloscope has.
So without problem you can skip the already known things, and in case of some doubt on one control, this list is a fast reference to refresh your memory.
Main controls
- ON/OFF: Switch on and turn out does not need explanations. On some models this switch is incorporated into the bright intensity potentiometer.
- BRIGHT: Also known as intensity of electronic beam, nothing to say except the need to increase it for very fast scan. For very slow scan time (100ms/Div for instance), such to see the moving dot instead of a continuous trace, the need to lower bright comes on. Indeed in this case a too high bright could excessively stress the screen in one zone running the risk of exaust it prematurely.
- FOCUS: To get into focus the electronic beam, adjust it to have a well defined trace. Sometimes influenced from bright control.
- TRACE ROTATION: To align horizontally the trace to the reference grid on the screen. Earth magnetic field in fact affect it visibly.
- XY: This key must remain inactive for normal use. It switch the horizontal deflection drive from internal time base to a second external signal (usually the second channel in a dual trace oscilloscope). In such configuration it is possible to see the Lissajous figures on the screen. That figures depends on shape of the two signals and on the ratio between theirs frequencies. For instance using two identical sinewaves draw a 45 degrees line on the screen. If the sinewaves have a 90 degrees phase difference draw a circle.
- TEST SIGNAL: This tip, not always present, emit a square wave signal available to calibrate capacitively the probes (see below).
Probes
The probe surely deserve deepening. Made by a coaxial
little cable ended at one end with BNC connector to
connect to vertical input of scopemeter.
At the other end there are two terminals, one for the ground
(crocodile clamp connected to outer shield)
and one for the core (a tip with a clip).
Usually it is possible to find two kind of probes ratio,
the one to one and the ten to one attenuating.
This data must be known as it affects the value of
vertical axis divisions.
It is normally stamped on the probe, moreover the
attenuating type has a small screw for calibration.
Finally, it is easy to cacth what kind of two it
belongs connecting the probe to TEST SIGNAL
which has known amplitude and frequency.
Amplified probes also exist but they are expensive and rares and do not change the concepts essence.
Moreover exist the so-called current probes to read the alternating current flowing into a lead. Practically they are splitted transformers made to be opened and coupled to a wire without disconnect it.
Impedance
Usually the oscilloscope input impedance is 1 Mohm,
the attenuating probes raise the impedance to 10 Mohm
so achieving the ten times attenuating ratio.
This data is useful to connect the probe to a such sensitive
point that may be altered from the connection itself.
In that case it is better choose the higer impedance probe.
Probes calibration
This means solely capacitive calibration since the
resistive part is fixed.
To calibrate a probe the TEST SIGNAL have to be used,
then adjust the little screw (capacitive trimmer)
until the square wave has perfect corners,
not rounded nor spike.
It is better utilize a plastic screwdriver because
using a metallic one sometimes just approaching and
touching the screw affects the calibration itself.
Voltage Input Channel
This section deal in vertical axis deflection on the screen.
The double trace oscilloscopes have two identical sections,
one for each channel, and in addition the channel selectors
after explained below.
However beyond the always present Volt/Division selector
there are:
- Coaxial connector (BNC) for input signal where to connect the measuring probe.
- Coupling selector among DC, GND, AC which allows the insertion of a capacitor between BNC connector and input (AC), the direct connection (DC), and the switch to ground (GND) to disconnect the BNC without phisically detach the probe.
- Position potentiometer (Y-POS), which sets the vertical position of electronic beam with input to GND, in other words it establishes the zero on the screen. Usually it is set at centre to see bipolar or AC coupled signals. To see positive signals only could be set in the lower part of the screen while to see two channel could be set one above and one below the centre as you like.
- There is a potentiometer usually situated on the V/Div selector. It modifies the V/Div value continuously instead than by predefined steps. This is useful to measuring the signal rise and fall time. At the moment we need just to check it is in off position otherwise the selected V/Div does not agree on the grid and the channel is not CALibrated. Please note that this is a resistive potentiometer and has got nothing to do with capacitive calibration in attenuating probes.
- Invert. This selector allows exactly to reverse the signal on vertical axis. We have to know it exist, sometimes it is handy especially in a dual channel oscilloscope.
Time Base
This section deal in horizontal axis deflection, beyond the time
per division selector there are:
- Position potentiometer (X-POS) which establishes the scan horizontal starting position.
- X10 multiplier (by 10), to widen ten times horizontally the trace. It is useful to better see for example the ending zone of the scan which should go out of screen changing the time base selector. In practice it stretches an horizontal division to the whole screen and so with X-POS potentiometer we can run all ten divisions long.
- HOLD-OFF, this potentiometer allows to rise the time
(H) to go from right end back at the left staring point of beam.
In practice it modifies the scan repetition period without
affect the the time per division value.
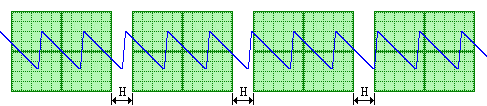 It is used in special cases when is difficult
to have a stable trigger.
During the H time the trigger is de-activated (it does not
generate starting events).
This time can be extened very much, well beyond (much more longer)
than one scan time. So in our picture the distance between scans
grows as far as go out from this page.
HOLDOFF can be used in two ways; A) Trying to approach
scan frequency to a multiple of input frequency to have
a stationary image almost;
B) To extend the time where trigger is de-active so to
mask (hide) temporal zones of input signal that
create the unwanted trigger events.
It is used in special cases when is difficult
to have a stable trigger.
During the H time the trigger is de-activated (it does not
generate starting events).
This time can be extened very much, well beyond (much more longer)
than one scan time. So in our picture the distance between scans
grows as far as go out from this page.
HOLDOFF can be used in two ways; A) Trying to approach
scan frequency to a multiple of input frequency to have
a stationary image almost;
B) To extend the time where trigger is de-active so to
mask (hide) temporal zones of input signal that
create the unwanted trigger events.
- There is a potentiometer on the Time/Div selector (as on the V/Div one) to modify the value continuously instead than by predefined steps. Now we need just to check it is in off position otherwise the chosen Time/Div does not have the wanted value on the screen grid because the time base is not CALibrated.
Trigger
This fundamental section allows to select the source of trigger
and also to filter the signal arriving at comparator that generate
the trigger event.
The main presets, described exhaustively in working principle , are the following:
- Level, potentiometer to adjust the intervention voltage value used as comparision by trigger comparator.
- Edge, also known as slope, to select between positive (rising) and negative (falling) of the input signal.
- Mode, choose one of the available (AUTO, NORMAL, SINGLE) trigger modes.
The source of signal is chosen between:
- CH 1 main input channel.
- CH 2 secondary input channel whereas exists.
- EXT dedicated BNC input for external signal not visualized but only used as trigger source.
- MAINS locks directly the trigger to mains power line frequency, the always present 50 or 60 Hz disturb. Note that of course in battery powered models this source lacks.
The filters usually available are:
- DC nothing at all, direct current coupled.
- AC alternating current coupled, removes the continuous component.
- HF insert high frequency filter.
- LF insert low frequency filter.
DUAL TRACE OSCILLOSCOPE
TWO CHANNELS OR TRACES
With two channels all the vertical section doubles, there are two separated BNC input connectors, two V/Div selectors and so on.Both channels have to share the single vertical deflection system in one of the following way:
- ADD stands for additive and draws only one trace summing the two input channels. Using the invert on one of them it will get the graphic difference.
- ALT stands for alternate and means that, at every end of scan, the channel driving the vertical axis is exchanged. This is easily seen with slow time base values. Rising the speed the human eyesight persistence allows to see just two separated traces at the same time.
- CHOP means that the vertical deflection drive is quickly exchanged by both channels during each scan. Therefore it is traced a little hyphen for each channel resulting in two separated traces at the same time. Indeed the dashes are so dense to seems an unbroken line.
Indeed doing the opposite the two mode flaws stand out. With CHOP the dashes are visible while with ALTernate it is visible one channel per scan (then the other one).
Now that you are able to use the oscilloscope and to describe how it works, deepen something more.
Carry on with deepening examples page of the tutorial.